


When I first began experimenting with portrait photographer, I felt intimidated by the complexities of off camera flash and studio lighting, I just wanted to take portraits!! So I would depend on natural light, rather than trying to incorporate more advanced lighting. (Although I now often use studio lighting, I still prefer to use natural light if it is available – it’s typically more flattering!)
During my years living in Northern Japan, I was at the mercy of the long winters and unpredictable weather, making it necessary to schedule sessions indoors when possible. Eventually, I learned to work within the limitations of my lighting and equipment and how to make up the difference in Adobe Camera Raw.
At the time I was shooting with a Canon 60D and knew that I had to adjust my exposure so that I could stay at/around ISO 400 to avoid noise. As you can see the results are a little underexposed, but since the Raw data is there, it’s an easy fix! Here is a quick Adobe Camera Raw tutorial that shows you how to save your underexposed images in Camera Raw without losing detail.

First: Drag and drop your Camera Raw file into Adobe Photoshop or open directly from Camera Raw.
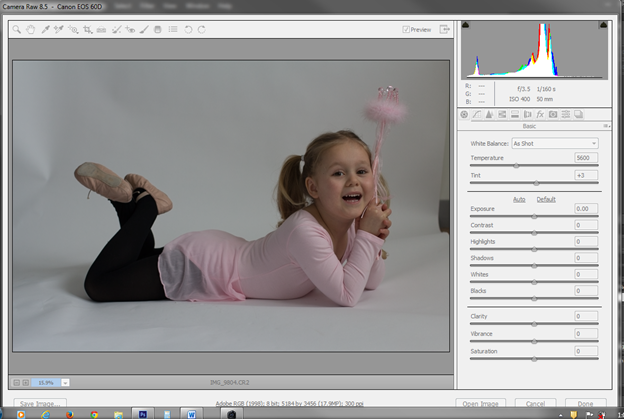
If you look in the upper right hand corner, you will see the histogram. This tells us the range of the overall exposure…left being darker and right being the lighter. If you click the small black arrows, you will be able to see if you are pushing the exposure to far and losing information such as the details in the whitest whites or the darkest dark.

Let’s experiment: Click on “Auto” to see what Camera Raw thinks the best exposure is for this portrait.

Not bad! But if you notice the highlighted areas…the red dots indicate that the highlights are “blown out” indicating there is nothing there but white space. If you printed this image as is, that area would have no detail and would be totally white.

The area is so small that I think this exposure is acceptable, however, for the sake of this tutorial, let’s press! Either click “CTRL+Z” to undo hold down your CTRL button until the “Revert” button replace the “Cancel” option. Click “Revert”. Now you’re back to where you started.
To manually adjust the exposure, use the sliders to the right starting with the “Exposure” and working your way down the list.

Pay close attention to the status of your histogram and keep an eye out for the red (highlights) and blue (shadows) warning dots. Once you are happy with your image, either click “Save Image” or “Open Image” to further edit in Adobe Photoshop.
You've just saved your underexposed image without losing detail or image quality! Hooray for Adobe Camera Raw! Next time, I'll continue working with this image to show an easy way to tough up the background in Adobe Photoshop! Have a great week!
P.S. - Was this tutorial helpful? Leave me a comment - I'd love to hear your feedback!
P.S. - Was this tutorial helpful? Leave me a comment - I'd love to hear your feedback!


